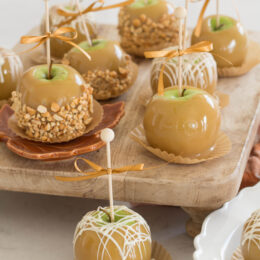
Gourmet Caramel Apples, the easy way!
Say goodbye to melting store-bought caramel squares, and hello to the most delicious homemade caramel apple recipe that's quick and easy!
Equipment
- Popsicle sticks, ribbon, cellophane, paper cupcake liners
Ingredients
- 5-6 granny or honeycrisp smith apples
- 1/2 cup (one stick, 8 tablespoons) salted butter melted
- 1/2 cup brown sugar
- 1/2 cup granulated sugar
- 1/2 cup sweetened condensed milk
- 1/2 cup light corn syrup I use Karo
- 1/4 teaspoon salt
- 1/4 teaspoon vanilla extract
Optional toppings:
- White chocolate melted
- Roasted, salted nuts chopped
- Candy bars of your choice chopped
- Milk chocolate melted
- Cinnamon and sugar (sprinkle over white chocolate)
Instructions
- 1. Wash and chill apples well before dipping. This is the biggest secret to success! Fully chilled apples help the hot caramel set quickly so it doesn't drip off. 2. Prepare a baking sheet by lining it with parchment or wax paper. Set aside.3. In a large microwave safe bowl (I use glass), melt the butter.Add white and brown sugars, karo syrup, condensed milk, and salt. Stir well to combine.**NOTE: I like to take my chilled apples out of the refrigerator while the caramel is cooking. Chilled apples will have a layer condensation on them as they come out of the refrigerator, so be sure to dry them off well before dipping! Push a popsicle stick handle all the way into each apple.4. Return the bowl to the microwave and cook for exactly 6 minutes, 30 seconds. (For me, 6 minutes wasn't long enough, and 7 was too long. 6:30 creates a perfectly soft caramel to coat the apples. Do not stir the caramel while cooking, just leave it in the microwave the entire time).Once the timer goes off, very carefully remove the bowl (caramel will be boiling) and place onto a hot pad on your counter. 5. Add 1/4 teaspoon vanilla and stir to combine. 6. Working quickly, dip apples into hot caramel and then slowly rock up and down in the air for about 15 seconds before you place them on a baking sheet lined with parchment or wax paper. This will allow the caramel to start to evenly set before you place it on the sheet. 7. If you're dipping your apples in chopped nuts or candy, be sure to do this quickly, before the caramel dries. I like to hold and rotate the dipped apple in the air about 15 seconds to allow the caramel to slightly set, then roll into chopped nuts or candy pieces. 8. If you're decorating with white or milk chocolate, or white chocolate with cinnamon and sugar, you can wait until caramel is all set before adding these toppings.9. Once the apples are dipped and decorated, I like to place mine on a paper cupcake liner, and wrap in cellophane to make them extra pretty. If you won't be eating them that same day, store in the refrigerator and let them come back to room temperature before you slice into them. Refrigeration is not required but it does help keep the apple fresh. 10. If you want to double this recipe, I would highly suggest just making two separate batches. I find that a double batch in one hardens before you can get each apple dipped well. Its very simple just to whip up a second batch, after the first has been dipped! I would love to know if you try this recipe, please tag or message me @handmade.farmhouse on Instagram!